4th of July Scrapbook Layout Ideas
It's Aboat Time! Here are summer and 4th of July layout ideas from our awesome Design team members. These festive scrapbooking layouts were made from our June 2021 kit, America by Echo Park.
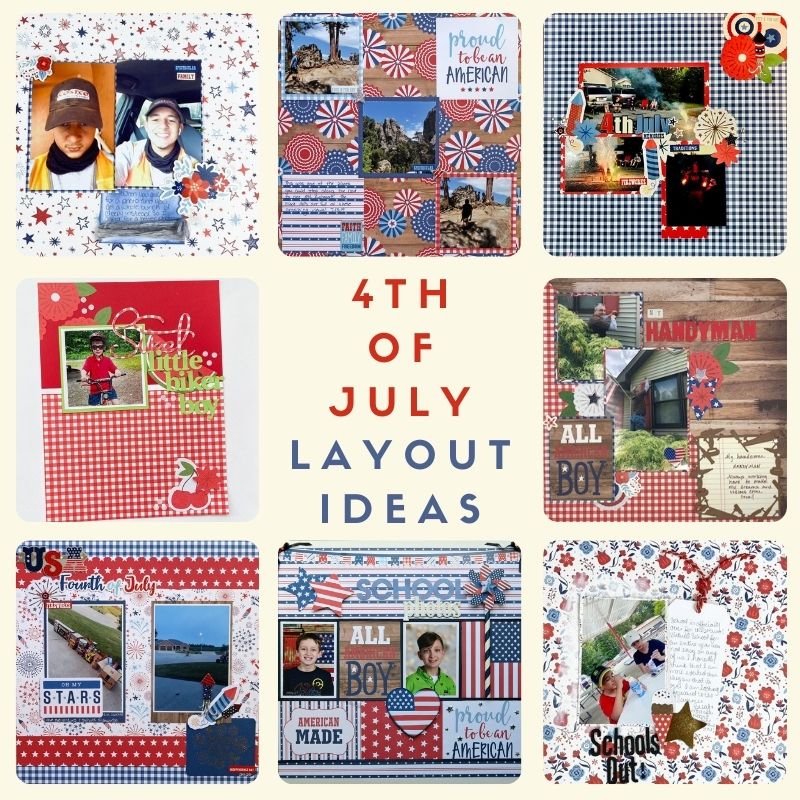
1. School Photos by Marci Bensing
Marci chose her background paper 1st with her photos but this time she chose and double matted her photos to the size of 2 of the cut-a-part sheet parts.
Marci always lays everything out from the current kit, ready to choose the papers she will use. She used a white piece of cardstock as part of her background from her stash and laid out her photos. She decided to change that up by separating the photos and alternating them with the two cut-a-parts.

Then, she used horizontal cut-a-parts and created the 3rd one with the red star paper. Below that, she adhered to a small piece of the same paper she used at the top of this layout. This now completes her background! On to embellishing to completion! At the top, she added the long banner sticker and added a bow/gem to each end. As for her title, she used alphas from her large alpha stash! - We all have that right?!?


To the left of the title, Marci used 2 stars from the kit's die cuts, pop dotting one of the stars and overlapping it. To the right of the title, she used another of the kit's die cuts, popping it up and popping up one of the Sticko stars and then she adhered it to a regular straw for visual interest. She inked the edges of the flag heart (Marci loves hearts!) and pop dotted it and overlapped it near one of the photos and star paper. Lastly, she added the dimensional Sticko stars in silver to the proud to be American paper.
This layout shows the versatility of a red, white and blue (July 4th!!!) collection! Don't forget to check out more of Marci's scrapbook layout ideas in her blog now.
2. 4th of July Memories by Megan Blethen
Megan picked which pattern paper she wanted for her background. She used one 6x4 photo, one 3x4 and one 4x3. Then, she matted two of the photos with the red star patterned paper from the kit.

In the 3rd photo, Meggy matted it with patterned paper sized at 1.5x5. Next, she clustered all three photos overlapping each other. Also, she puts one cluster at the top right hand corner of her layout. She placed the title on the 6x4 photo and a small cluster under the title. Meggy put the 2nd cluster to the left of the photos and put the 3rd cluster to the right of the photo cluster.


Make sure to watch Meggy on her Youtube channel and get to watch more awesome scrapbooking layout ideas.
3. Handyman Layout by Melissa Bierlein
Melissa had a hard time because she didn’t have the 4th of July photos!! Her sister passed away on the 4th of July 26 years ago so they normally stick close to home and have a chill relaxing day on this holiday. In one of her photos, you can see part of an American flag so she went with it!! This is a non-holiday layout with a holiday kit!! Melissa loves that we always get her thinking outside the box!
For her layout title, she chose ‘My handyman’ featuring her awesome husband! The alphas are from her stash. As for the background, she chose the wood paper by Simple Stories from her stash. She cut the red check from the kit on a diagonal and adhered it to the wood paper.
Melissa backed the photos with papers from the kit and layered them on the layout. She used the journaling block ‘All American Boy' from the kit. This really does describe her husband!

The photos and journaling card are popped up on foam tape giving Melissa the ability to tuck the embellishments underneath. As for the journaling, the journaling box is a metal die diecut from Tutti Designs. Cut with brown cardstock from her stash and backed with lined paper and added the handwritten journaling. Then, she added some silver stars from the upgrades to this frame.
Now is time for the embellishments. She added items from the sticker sheet and all three upgrades creating three clusters around the photos. Don't forget to check Melissa's blog to see more scrapbooking layout ideas.
4. 4th of July Layout by Samantha Taylor
Making a 4th of July layout with this kit is a no-brainer. Scrapping your Independence Day photos will be a piece of cake with this kit. For this layout, Sam focused on one of their favorite things - setting off fireworks. Don't worry, it's legal where she lives and they invite and notify the neighbors that they'll be making some noise.
Sam started the layout with a base of 12" x 12" firework paper. Then, she added a 1" x 12" strip of blue gingham and a 1 1/2" x 12" strip of red star paper to the top and bottom of the layout. She used 4" x 6" Journaling Cards to frame her photos - the trick is to use journaling cards where the words don't stick out around the edges of your photos.

Finally, she added 3 different groupings of embellishments. Also, she used a mix of embellishments and stickers from the included sticker sheet and all three embellishment upgrades.
5. Rushmore from the Road Layout
Two summers ago, Samantha visited Mt. Rushmore for the first time. She took a lot of pictures and thought the patriotic/ USA theme of this kit would be great for scrapping some of her Mt. Rushmore photos. Her photos seemed to lend themselves to be cropped to a square, so with that in mind, she created a square-based layout. She used woodgrain paper as the base of her layout. Then, she cut the 4x4 Journaling tag paper up into its pieces.

Next, she used 3 of the tags to frame her photos. also, she used one of the tags as an embellishment and used the backside of one of the tags as her actual journaling tag. Finally, she finished up by adding some stickers from the included sticker sheet and some embellishments from the embellishment upgrade. Get to see more amazing scrapbook layout ideas on Sam's blog now!
6. Sweet Little Biker Boy Layout by Sara Mishler - Sara Scraps
Sara started with an 81/2 X 11 sheet of red cardstock. She trimmed the Celebrate Fireworks paper to 81/2 X 6 and placed the patterned paper on the bottom of the cardstock. Also, she used a 1/4 inches strip of white cardstock to trim where the patterned paper meets the cardstock.
Sara matted her 31/2 X 31/2 photo with white and green cardstock. She placed the photo 1/3 of the way down on your page, overlapping the gingham paper. Next, she used words or letter dies to create her title, using gingham paper and green cardstock. Then, she placed three or four of the largest die cuts on the page, creating a triangle.

Finally, she layered the title on top of the die cuts and then added white sequins as accents. Watch more of Sara's beautiful scrapbooking layouts on her YouTube channel!
7. Schools Out Layout by Beth Soler
Beth took the liberty floral paper item #AM213003 and put a light covering of Liquitex gesso on the left side of the paper. She used her fingers to smudge the gesso so that she would not have any harsh lines. Then, she did this to fade out the florals so that the photo would stand out more.
Next, she mounted her 4x6 photo on a piece of the Celebrate Fireworks item #AM2130007. Before she mounted her photo to the paper she distressed the edges with her Cricut paper distresser tool. Then, she added foam tape to the back of the photo so that it would pop up some.

Then, she cut a tag out of some white cardstock from her stash so that she could journal the story and she lopped some red twine through the tag. Next, she added some of the die cuts from the pebbles die cut pack. Finally, used some thickers from her stash for the title and adhered them with art glitter glue.
8. Spectacular Family Scrapbook Layout
Beth used the 4x6 journal cards paper item #AM213006 as her main background for two 4x6 photos. She backed the photos with the B side of the Liberty Floral paper item #AM213003 and popped up the photo on the right side with foam tape.
Also, she grabbed some of the floral stickers that came with the paper pack and added craft foam to the back of the stickers to give them some dimension. She adhered the photos to paper and then adhered the stickers around the photos.

She cut a piece of white cardstock and distressed it with faded jeans distress oxide ink for my journaling card. Finally, she wrapped some sari ribbon around the journaling card and attached the sari ribbon with some Yes glue to the back of the card. Be sure to watch Beth in her YouTube channel for more layout ideas.
Enjoy creating your June projects with these awesome guides. Visit our blog for more scrapbook layouts using our monthly kits!
Join our exclusive Facebook Community for Club Members. It will grant you access to amazing layouts and content made by our design team, fun monthly contests, and FREE Facebook Live tutorials to meet other crafters!
Haven't subscribed yet? Now's your chance, be sure to sign up today!
GET OUR MONTHLY KITS DELIVERED TO YOUR DOOR!
