7 Family Inspired Scrapbook Layouts
Love is what makes a family! Our awesome design team members shared with us gorgeous family inspired scrapbook layouts using our November Collection, This is Family by Jen Hadfield. Let your family know just how much you love them with your very own family story layouts!
1. You at 14 Layout by Samantha Taylor
This layout uses the base kit and all of the upgrades. Sam takes her kids' photos every year. She likes to use one of their annual photos to tell a bit about who they are at that age at that time. November's kit was perfect for placing the spotlight on who her son is at the age of 14. She used the tree patterned paper as a base for her layout and added an angled piece of light blue striped paper. Then, she placed a 1/2" strip of gold floral paper at the top and the bottom of the layout.

Next, she used the edge strips from 2 pieces of patterned paper to frame the angled piece of paper that she used. She attached a 4" x 6" photo with foam adhesive and added a journaling tag from her stash. Also, she stamped "love you" on the tag and added journaling. She cut sentiment flags from patterned paper and layered it on her layout. Finally, she added enamel dots, icon, and word sticker embellishments from this month's sticker sheet and the upgrade word sticker sheet.
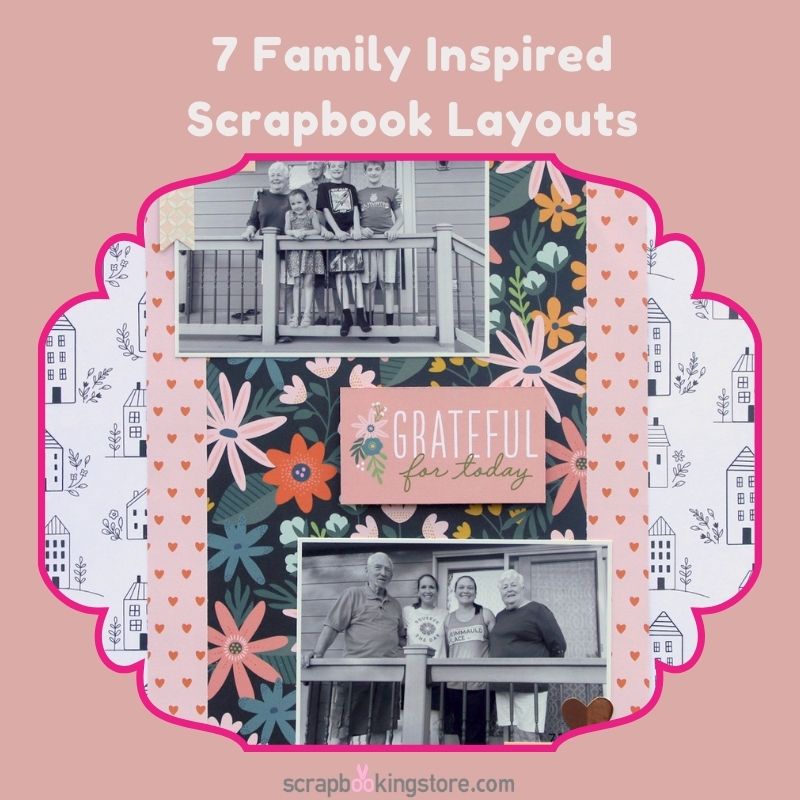
2. Grateful for Today Layout
Sam doesn't scrap a lot of black and white photos but the black and white home patterned paper in this kit was just calling for her to be paired with some black and white photos. She had some photos of her grandparents visiting this summer. They were all dressed in a lot of different colors, so converting them to black and white helps them stand out instead of the colors clashing. The family theme of the kit made scrapping grandparent/great grandparent photos so easy!

She used the black and white house paper for the base and attached a strip of black floral paper to the center of the layout. Then, she added a strip of heart patterned paper to each side of the black floral paper. Next, she attached the photos and added the "grateful for today" tag to the center of her layout. Finally, she embellished her layout with enamel dots included from the upgrades and stickers from both the base kit and upgrade kit.
3. We Are Family Mini Golf Layout
November's kit is great for celebrating relationships and family bonds. Sam had some photos from mini golfing with her family this summer. Mini golf is as much about the fun family time as anything else and this month's kit is perfect for telling that story.

Sam started her layout by using the piece of blue and green patterned paper as her base. She added a strip of black floral patterned paper at a diagonal on the base and layered on a piece of light blue striped paper on top of the black floral paper. Next, she added photos and added embellishments from the base sticker sheet and the upgrades around the photos. The enamel dots are just perfect with this layout!
Get to see more of Sam's gorgeous family inspired scrapbook layouts on her blog!
4. Big Crossword by Melissa Bierlein
Melissa’s husband loves crosswords! They found this HUGE crossword puzzle in a paper once and her husband loved it. Melissa started using the heart paper as her base. Then she used a five inch strip of the house paper on the right of the layout. The paper strip between the two pieces was actually from the edge of another paper in the kit!
As for the title “BIG CROSSWORD”, Melissa used letters from her stash. The red letters “BIG” are metal from Making Memories. She had them for years and really thought they popped on this paper. “CROSSWORD” letters are thickers from Amy Tangerine.

For the Crossword Cut File, Melissa found it on Etsy (www.etsy.com/listing/825705489/dad-crossword-puzzle-svg-png-digital). This was a DAD crossword SVG, she just cut the ‘AD’ off of Dad since this was for her husband! Plus, all the other words on it fit perfectly! She cut out some black cardstock and mounted it on white cardstock from her stash. Then, she used a black Copic marker to fill in the white areas around the words.
Lastly, she used a distress tool to rough out the edges and mounted the cardstocks on a torn vellum. Now onto the right side of the layout, Melissa doubled up the photos just for fun! She stamped “find joy in the ordinary” on the polka dot paper with the stamp set from the upgrades (ink Real Red from Stampin’ Up)!


Finally for the embellishments! Melissa added some strip journaling at the bottom from both the sticker sheet and the upgrades. Next, she added three clusters of enamel dots, heart stickers and of course a pencil from the sticker sheet.
Check out more of Melissa's adorable family inspired scrapbook layouts on her blog!
5. Oobleck by Marci Bensing
Marci started her layout by choosing the background paper as her base and the photos she will use for her layout. Everything on this layout is from the base kit and upgrades (the enamel dots are so cute!). Next, she chose and cut pieces of pattern paper and adhered it beside the photos. She typed her small title and put it on top.

As for the embellishment, she used ALL aspects of this kit. Then, she "popped" up and inked the edges of the small word strips. Next, she stamped the hearts, vines and the saying. Also, she "popped" up the pencil and laid it diagonally across the small title. Lastly, she popped up the "let go" sticker and placed it in the center of her four photos. Make sure to check out Marci's family inspired scrapbook layouts and crafts on her blog!
6. Hello Fresh Tomatoes by Sara Mishler (Sara Scraps)
Sara started her layout with a sheet of white cardstock from her stash as the base. She cut a 4X12 inch piece from the Bits & Pieces paper. Then, she distressed one long edge of the paper and added brown ink to the edges. She adhered to the patterned paper flush against the bottom of the white cardstock. Also, she cut a 6X12 inch sheet from the Growing Together paper and fussy cut all the gardening elements from one half.
Sara fussy cut about a dozen images to layer and clustered them together. She trimmed a 41/2 X41/2 piece to use to mat your photo from the red text side. Next, she adhered a 4X4 photo to the photo mat, distressed and inked the edges. Then, she added dimensional adhesive and placed her photo so it overlaps the green paper on third. She chose a salvage/branding strip from one of the papers and the strip from the House Plants paper, then placed the strip across the top of the layout, flush with the upper edge.

Next, she used some coordinating alphabet stickers and placed your title to the right of the photo along the top of the green paper. Sara chose white stickers on top of the white cardstock. Any color will work as a title on white cardstock. Also, she used a stamp set to add a subtitle to her title and another in the upper right-hand corner of the page. Lastly, she creates three clusters using the fussy cut elements, the puffy stickers, phrase stickers, and the heart stamp from the upgrade kit.
Don't miss out on Sara's scrapbook tutorial on her YouTube channel!
7. Be Happy by Meggy Blethen
Meggy is super excited to be sharing her first project with us using the November kit. This kit is so gorgeous! She had a lot of fun using it along with the upgrade kit pieces. Here is how she made her layout.
Meggy started her layout by pulling out a 12x12 scrap of paper to use as her background and as a gluing base for all the other papers she used. She cut the House Plants patterned paper to 7 in x12 in and glued it to the left side of the base. Then, she cut the Fresh Picked paper to 3.5 in x 12 in and also glued it to the far right of the House plant paper. Also, she cut the Fresh Picked paper left over to 1.5 in x 12 in and glued it to the far right of the base.

Then, she tore the Fridge Art paper to 1.5 in x 12 in and glued it to the left of the Fresh pick paper she glued to the base. She matted a 4x6 photo on the Sending Love patterned paper. Next, she glued a dimensional adhesive to the photo and glued it to the background. Meggy made her first cluster to the top right of the photo and the second cluster to the bottom left of the photo. As for the third cluster, she placed it to the top left of the layout.
Finally, she added the title and cluster it around the photo. Make sure you don't miss out on Meggy's fun family inspired scrapbook tutorials on her YouTube channel!
You'll find the perfect bits & pieces for your next family themed project with these awesome family layouts that our design team members share with us!
Visit our blog for more craft and layout inspirations using our scrapbooking kit.
Join our exclusive Facebook Community for Club Members. It will grant you access to amazing layouts and content made by our design team, fun monthly contests, and FREE Facebook Live tutorials (Nov 18) to meet other crafters!
Haven't subscribed yet? Now's your chance, be sure to sign up today!
GET OUR MONTHLY KITS DELIVERED TO YOUR DOOR!
