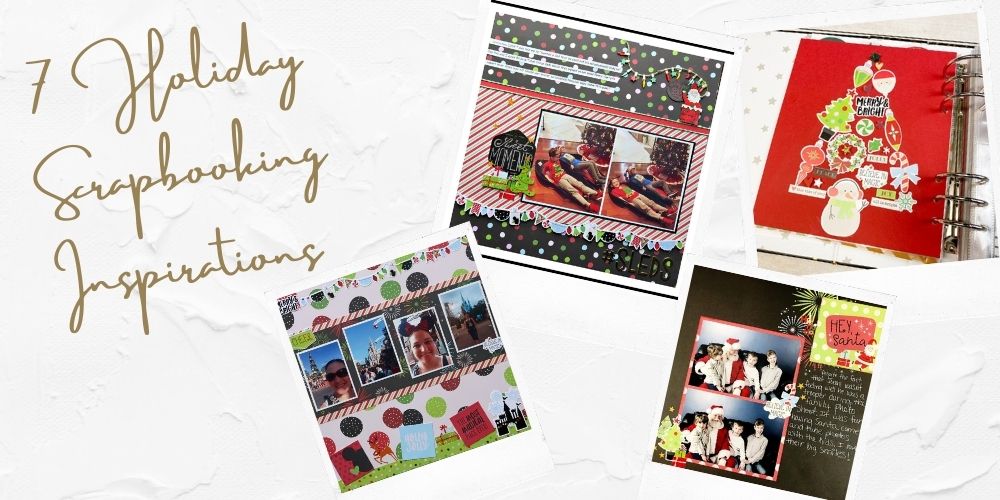
7 Holiday Scrapbooking Inspirations
Christmas has me feeling extra Santa-mental with these gorgeous holiday scrapbooking layouts from our awesome design team members using our December Collection, the Say Cheese Christmas by Simple Stories.
Let's get started with our very first adorable layout by Marci!
1. Sleds: Sweet Moments by Marci Bensing
Marci laid out all of the December kit components along with the photos she selected of her grandsons from last Christmas. She started by composing the basic design of her layout. As for the background patterned paper, she cut and placed the diagonal striped paper 2 inches from the bottom on the BG paper. Next, she popped up the border sticker for some dimensional effect and placed it at the bottom of the diagonal paper.

This has given Marci her vision for this layout, so she proceeded to embellished and title this page. In the completed layout above, Marci double matted the 2 photos. She created a cluster to the left of the photos and "popped" a couple of the items. Then, she placed a 1/4" strip of red cardstock above the photos and used her signature twine above and below that strip (she just LOVES twine!)


Marci typed and cut journaling strips, ripping the ends and adhered to the page. She used the Thicker's letters for the simple title "#SLEDS". Finally, she placed Santa/chimney, word circle and part of the Jolee's light strip to complete this simple but effective layout, using something from every aspect of this collection! Don't forget to check out more of Marci's awesome holiday scrapbooking layouts in her blog now.
2. Believe In Magic by Meggy Blethen
Meggy is in love with this month's kit and she can't wait to get busy scrapping tons of Christmas memories with it. For today's layout, she used 2 4x6 photos of her kids posing with Santa in 2015. Here's exactly how she made this layout:
She used Say Cheese Christmas Magical Holidays Background paper and turned it sideways. They've never taken their kids to Disney, let alone at Christmas, so she didn't need the castle theme, but she did like the fireworks on this paper.

Meggy cut out the "Hey, Santa" 4x4 card from the 4x4 Elements patterned paper. Then, she inked edges with Close to my Heart Pomegranate ink and glued down to the top right corner, covering the castle. Also, she matted the photos on the Best Christmas Ever patterned paper, inked edges with pomegranate ink and glued to the bottom left of the page.


Next, she embellished the bottom left of the photo using the sticker sheet in the main kit and the Sticko Stickers from the upgrade kit. Then, she added a second cluster using the stickers between the two photos. Lastly, she added a third cluster up by the "Hey, Santa" card.
Make sure to watch Meggy's holiday scrapbooking layouts on her Youtube channel.
3. All Mine by Melissa Bierlein
Melissa started her layout using a very light green cardstock from her stash as the base. She used a 6.5” strip of the word paper on the right and added a 1/2” strip of the striped paper as a border. As for the photo area, she layered two different papers from the kit; one is 8 1/4” square and one is 8” square. Then, she used two papers with circles to correspond to the circle tree cut file.
She backed the photos with the pink holly paper to match the jammies in the photo and popped the photo’s up with foam tape to make room for the hidden journaling card. The card itself is from her stash. She used file folder tabs from the sticker sheet at the top to easily pull out the card. Next, she decorated with a sticker from the upgrades and some handwritten journaling. Also, she used the ‘documented’ sticker from the upgrades in the upper left and presents from the upgrades in the lower right.

Circle Tree cut file: The cut file is from Paige Evans and was cut on her Cricut with green Bazzil cardstock from her stash. She backed the file with different papers from the kit. Then, she used a scrap of yellow cardstock for the star and blinged it up with a gold Wink of Stella. Also, she added the tree lights from the upgrades.


Title: Melissa used the Thickers from the upgrades to spell out ‘ALL MiNE’ to mimic the shirt in the photo. She wanted some bling under the title so she used a black gem swirl from her stash. Lastly, she added the gold arrow by Thickers from her stash to the photo pointing to the ‘all mine’ on the shirt. Don't forget to check Melissa's blog to see more winterful holiday scrapbooking.
4. Christmas Eve Layout by Samantha Taylor
Don't let the famous mouse theme of this kit fool you. This kit is great for all kinds of Christmas scrapping. Sam loves the mix of traditional and non-traditional colors. It's a unique blend that feels totally fresh and new. She started her layout by choosing her background papers. She matted the photo and added "Merry Christmas Eve" as her title. To finalize, she embellished her layout using bits of the upgrades.

This month's embellishment upgrades really help this kit be versatile for all kinds of holiday scrapping. Pick up the sketch that this layout was made from and join Sam on our Facebook page on December 16 to watch her create a second layout with the sketch.

5. Merry and Bright Layout
For this layout, Sam really leaned into the Disney theme. A few years ago, a friend and she spent a day at the Magic Kingdom just a few weeks before Christmas. Sam has slowly been scrapping some of those photos but never seem to have quite the right papers. This kit really fixed that for her!
Sam started this layout by using a piece of large dot paper for the base. Then, she cut a 12" x 5 1/4" piece of red/green striped paper and attached it to the base. She also cut a 12" x 4 3/4" piece of black burst paper and attached it to the base.

As for the photos, Sam cut a 12" x 3/4" piece of green dot paper and attached it to the base. Next. she layered the paper squares and coordinating stickers on top of the green dot paper. She added garland stickers to the top of the layout and finally added additional stickers around the photos.
Get to see more amazing holiday scrapbooking layouts .on Sam's blog now!
6. Great Memories by Sara Mishler - Sara Scraps
For this layout you will need the following papers and embellishments: Happy Place Paper, white cardstock, AC stickers from the upgrade kit, Believe in Magic paper, snowflake metal die, winter background stamp, blue ink, red and yellow cardstock.
Sara used a white cardstock as her base. Then, she stamped a winter stamp in blue ink 6 inches into the page. Sara used Catherine Pooler Sweater Weather Background stamp and Juniper Mist Catherine Pooler ink. Then, she cut a strip of the Happy Place paper 3X12. She tore one edge and layered it over the stamped area.

Sara used the bottom blue part of the Believe In Magic paper and yellow cardstock to mat her photo. Also, she adhered the photo with foam tape 1/3 of the way up the page, overlapping the stamped border. Next, she die cut 9 snowflakes from the yellow, red, and blue bottom of the Believe In Magic paper.
She trimmed a 1X12 inch strip to the opposite side of the page. Sara chose three areas on the page and on each area, she clustered 3 snowflakes die cuts and a sticker. Lastly, she added foam adhesive to the back of the stickers. Make sure to watch winterful and awesome layouts on Sara's Youtube channel!
7. Christmas Holiday Traveler's Journal Notebook by Beth Soler
Beth cut the baking paper from last month's kit to 7x8.25 and a piece of red cardstock that she had in her stash to the same size. Then, she glued the papers together using some double-sided tape and punched the correct holes so that the paper can fit in the album.

She lightly sketch out a Christmas tree on the red cardstock. For this step, she basically sketched out a triangle with a rectangle for the stump in the middle. This sketch is just so that you can get the placement of the stickers. Beth used the sticker sheet that is in the kit and adhered the stickers to create a tree. She filled in the smaller bits of the tree with some old colorcast designs acrylic pieces using liquid adhesive glue.

For the 2x2 page, Beth cut apart the page that came with all the 2x2 squares printed on it and placed some of them in the pocket. She didn't fill it so that I would have some room for a story to tell on the day that I use that pocket page. Watch more crafty videos on Beth's Youtube channel!

Slide some of these clever holiday scrapbooking layouts into your craft room that will sleigh your loved ones when they get your cards or layouts. It's a mistle-toast to the holiday season.
Visit our blog for more craft and holiday scrapbooking layout inspirations using our scrapbooking kit.
Join our exclusive Facebook Community for Club Members. It will grant you access to amazing layouts and content made by our design team, fun monthly contests, and FREE Facebook Live tutorials (Dec. 16) to meet other crafters!
Haven't subscribed yet? Now's your chance, be sure to sign up today!
GET OUR MONTHLY KITS DELIVERED TO YOUR DOOR!
