Best of Summer Scrapbook Layouts
As the temperature increase this summer so does the fun to be had in the sun. Here are summer scrapbook layouts from our awesome Design Team members. These summer scrapbook layouts were made from our July 2021 kit, Safe Travels by Simple Stories.
1. Suit Run by Marci Bensing
Marci started all her layouts by laying out the kit components. She chose photos and probable background papers. The design unfolds!
She loves the tag paper page and knew immediately that she wanted to create some kind of tag "border". For this photo, she left the spot on the lower right where she will place the 4th tag to show that she has a clear pocket underneath the tags where she placed a lengthy journaling story.

Marci adhered to the tags on the bottom so that the tops can easily lift to remove the journaling sheet. She cut a 3-inch strip of the dotted paper. Next, she cut a 3-inch strip of the golden arrow paper then she cut the ends into a banner and placed them on the background sheet. This completes her basic background. Then, she went around and around the page embellishing.


For the title: Marci used her Silhouette Cameo to cut the word "SUIT" and letters from her stash for "run". She used the faux buttons in the kit on the top of each tag and used the "&" around the tags too. She popped up the word phrases and placed them overlapping the photos. The arrow that says "thanks" was pointed to the words on the photo thanking friends and family for their contributions. This is why her nephew is running in a suit and umbrella hat-he reached his goal!
Lastly, Marci used some solid navy cardstock to border around this page as well as the dotted paper. Don't forget to check out more of Marci's scrapbook layout ideas in her blog now.
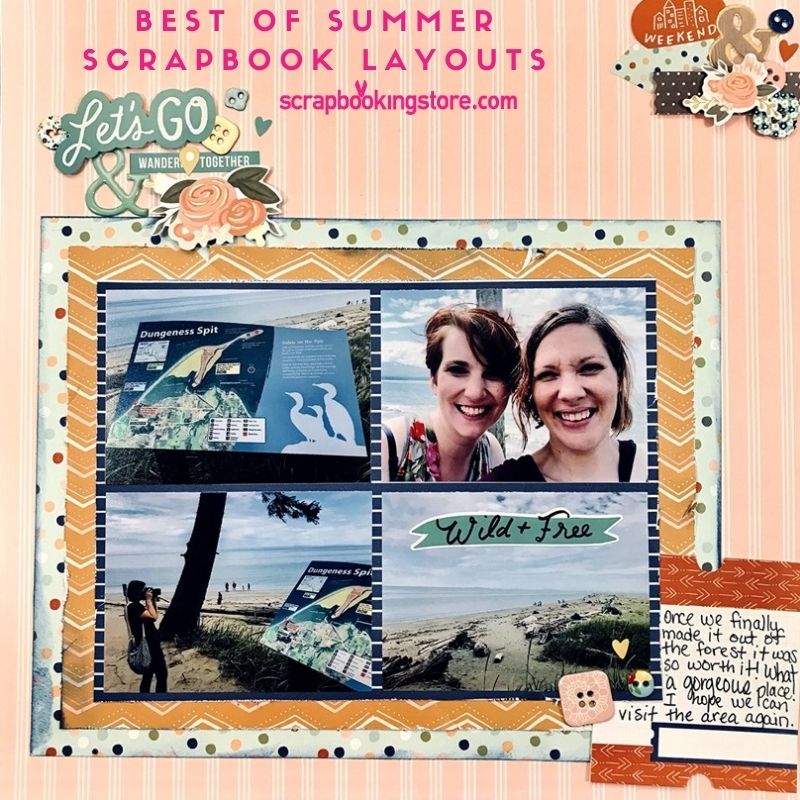
2. Wild and Free by Megan Blethen
Megan shared with us a simple gridded layout with layers. Hopefully, she can inspire you to play with layers this month! She picked her background paper (2x2/4x4 elements) and cut down 4 photos to 4x3. Then, she matted on a patterned paper and distressed the edges with scissors. She matted again with patterned paper (Take me somewhere) and distressed the edges with scissors.

Megan matted again with Weekend vibes paper and inked the edges with navy blue ink, or any color of your choice. She used the "Let's Go" sticker from the sticker sheet as part of the title in the top left corner of photo mats. Next, she embellished the title with flowers, chipboard buttons and heart stickers. Also, she embellished the top right-hand corner of the layout with stickers and 3d stickers from the upgrade kit.


She cut out small journaling cut apart from one of the journaling pattern papers (Journal Elements) and glued it in the bottom right corner under the photo cluster. Finally, she added embellishments around the journaling card. ALL DONE!
Make sure to watch Meggy on her Youtube channel and get to watch more awesome summer scrapbook layouts.
3. Anniversary Trip Layout by Melissa Bierlein
Here is Melissa's layout submission along with instructions and close-up photos! This layout is about the cottage they stayed in during their 25th Anniversary Trip!! The cottage was perfect and decorated so beautiful inside and out so she had to take photos of every little thing.
As for the background: Melissa used one of the patterned papers from the kit. For the photo area, she cut down the patterned paper from the kit to 8”X9”. She backed that piece with a sheet of red cardstock from her stash and cut it at 8.25X9.25. The 4X6” photo is backed with patterned paper from the kit and then popped up with foam tape.
")
Melissa arranged small photos around the larger one to create the look of a frame around it. Next, she cut the tags out of the tag 12X12” paper from the kit, punched holes, and added twine from her stash. She arranged four tags on the top of the photo area and four on the bottom so the tops hang out on both ends. This entire piece is then popped up on foam tape to allow for hidden journaling.

")
Hidden journaling: She tucked the journaling behind the right-hand side of the photo area, where the photos are attached. As for the title area, she completed it with puffy alphas from SEI that came from her stash. Finally, she used the sticker sheet and all three upgrades to embellish the layout. The chipboard buttons are tucked behind a few of the tags. Don't forget to check Melissa's blog to see more scrapbooking layout ideas.
4. Tag Layout by Samantha Taylor
Sam loves that this travel-themed kit is great for both urban and rural travel photos. Usually, you get one or the other but with July's kit, Sam's been able to scrap both camping photos and international travel photos. For this layout, she was inspired by the sheet of tags.
She started with the light blue dot paper for her base. Next, she layered a 10 x 10 piece of blue striped paper on top of it. She printed her photos so they were as wide as the tags on the tag sheet of paper. The tags were a bit longer and she just trimmed that off the bottom. Also, she picked 6 tags that she liked the best, layered her photos on them, and attached them to the layout. She finished up by adding some stickers from the included sticker sheet.

5. Balcony Layout
This kit is full of amazing patterned paper. Even if you don't have any travel photos to scrap, you're going to love playing around with the gorgeous patterned papers.
This layout features some urban travel but would work for almost any theme if you cover up the "travel notes" on the journaling card. Sam started with the multi-color dot paper for the base. Next, she added a 5 1/2" strip of pink stripe paper to the center of the layout. Also, she framed that paper with strips of blue stripe paper. Then, she added her photos and a 4 x 6 journaling card.

Finally, she added stickers from the included sticker sheet and embellishments from the Embellishment Upgrade Kit.
6. Subway Layout
Sam don't normally love color mustard yellow papers but in this kit it is just the perfect accent color and as you can see in this layout it became the perfect focal point color! She started with the blue geotag paper as her base. Next, she added an angled layer of blue dot paper. Then, she layered the mustard arrow paper on top. She added her photo at the center of the mustard layer.

Also, she lined the square "Go See Do" with blue dot paper and used it as her journaling tag. Finally, she added stickers from the included sticker sheet. Get to see more amazing summer scrapbook layouts on Sam's blog now!
7. Summer Vacation Layout by Beth Soler
Here is Beth's project for July. This layout is one of her most favorite layouts! She used Safe Travels items #14813 as her base paper. Then, she cut Safe Travels item #14812 in half and adhered it to the bottom half of her base paper.
Beth cut 3 tags from the Safe Travels item #14809 paper. Next, she printed one 4x6 photo and 3 smaller photos using the Project Life app. She backed the larger 4x6 photo with some tissue paper and added the 3 smaller photos to the tags that she cut out.

Also, she took word stickers from the sticker sheet and adhered those to the top of the border paper. She used the Vacation sticker from the sticker and some alpha stickers that she had in her stash to make the title Summer Vacation. Finally, she took a label sticker that she had in her stash and added it to the bottom of the 4x6 photo to add some journaling. Be sure to watch Beth in her YouTube channel for more summer scrapbook layouts.
Enjoy creating your July projects with these awesome guides. Visit our blog for more scrapbook layouts using our monthly kits!
Join our exclusive Facebook Community for Club Members. It will grant you access to amazing layouts and content made by our design team, fun monthly contests, and FREE Facebook Live tutorials to meet other crafters!
Haven't subscribed yet? Now's your chance, be sure to sign up today!
GET OUR MONTHLY KITS DELIVERED TO YOUR DOOR!
