Camping Scrapbook Layouts and Crafts
Life is best when you're camping! Here are fun camping scrapbook layouts from our awesome Design Team members. These crafts were made from our September 2021 kit, Happy Camper by ScrapbookingStore.
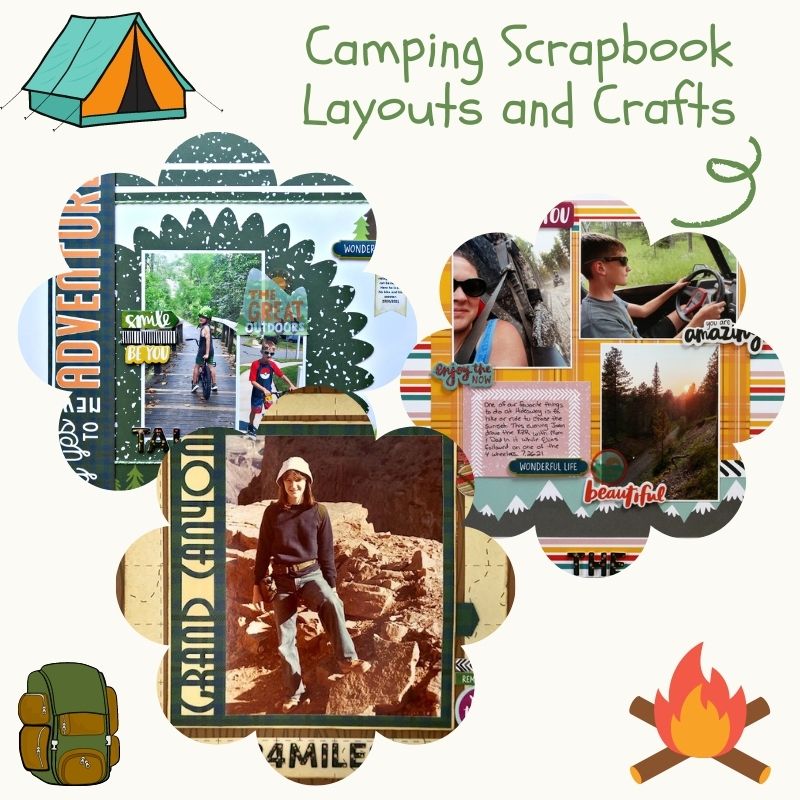
1.Smile Be You: Talan by Marci Bensing
Marci always starts her projects by laying out all of the supplies and choosing photos. She cut her original background choice into a scalloped circle and used white cardstock as a background paper. Then, she cut some of the borders to use on the layout.
Next, she cut the remaining speckled green paper into a 1", 1/2" and 1/4" strip and placed them at the top of the page. She placed those border strips, using "pop" tape to add dimension to the title strip, she also added twine for dimension from her stash. Also, she used a white cardstock as a frame for her photos and placed them on the scalloped circle.

Above the smaller photo, she added the GREAT OUTDOOR sticker. Below the larger photo, she used the Thickers to add "Talan". Then, she went around her layout and add the remaining embellishments until she was satisfied!


Marci added an 1/8" strip of white cardstock to her title strip to add some pop to it. She clustered to the left of the large photo the dimensional stickers. On the upper right, she added the tree sticker and the dimensional Wonderful Life. Typing the journaling area, Marci inked it with green ink and cut it into a banner and placed it under Wonderful Life. Don't forget to check out more of Marci's camping scrapbook layouts ideas in her blog now.
2. The Great Outdoors by Megan Blethen
Megan picked out her background paper and cut the border off it. She used 2 4x6 photos and matted them on a patterned paper. Meggy used the blue and green plaid. Next, she picked a second matt for the photos and glued it down onto the background with the photos.

She used the Amy Tangerine foam stickers from the embellishment pack to create 3 clusters. One in the top left corner, one above the photo in the right corner and the last in the bottom right corner of the photo.


Megan added her title and put it part of her cluster above the photo in the right corner "The Great Outdoors" sticker from the embellishment kit. Voila! You're all done! Make sure to watch Meggy on her Youtube channel and get to watch more fun scrapbook layouts.
3. Grand Canyon by Melissa Bierlein
Melissa's dad planned the best vacations growing up and she had many great memories. This showcases her when they visited the Grand Canyon. They hiked rim to rim which is 24 miles. They arrived in a camper driven by their family friends. While they hiked, her Mom and family friend drove the camper to the other side of the canyon so they could pick them up!
As for the base kit: She used the wood grain paper from the kit and cut the center out of it for use later. Then, layered on the paper that resembles a hiking trail and inked the edges of this paper with distress ink. Also, she put down the middle of the wood grain paper that she used for the background.

For the photo area, she cut the cut file from Cricut Design Space out of the blue and green check from the kit. The photo she had was 8X10; it’s trimmed to about 7X9” to fit in the cut file opening. She adhered that to some cream cardstock from her stash. The edges of the cardstock are inked with Distress Ink.
Melissa chose the cream color to coordinate with the hiking trail paper and so there would be a light color under the ‘Grand Canyon’ portion of the cut file. Next, she used foam tape on the back of the cream cardstock to make a pocket for the hidden journaling and to give the layout some dimension.


Hidden Journaling: She used two of the journaling cards from the kit; cut down the banner card a bit to layer on the red check card. Melissa printed her journaling on a transparency and adhered it to the card with a Zyron. Also, she added some stickers from the upgrade and cut a banner with the same paper used for the cut file. Then, she glued it together on each side of the journaling card to create a pull out.

Melissa created three different clusters around the layout using the stickers from the upgrades. She used the Thicker alphas to put #24miles at the bottom of the photo. Don't forget to check Melissa's blog to see more camping scrapbook layouts.
4. New Adventures Layout by Samantha Taylor
It's been a while since Sam shared a 2 page layout. She have so many photos that are perfect for September's papers that she figured it was time for another 2-pager. She used some gray card stock from her stash for the base of this layout (but you could skip this step and use the patterned paper as the base).

Sam cut the mountain paper and the red chevron paper to 6" x 11 1/2". I used a strip of 1" x 12" yellow plaid paper on both halves to join the bottom half and bottom half together. From there, she added her photos and a journaling tag. Then, she cut the strip "Say yes to new adventure" and cut it apart before adding it to the bottom of her layout.


The included sticker sheet is especially fun. They are puffy, so they add a lot of dimension, and there are just so many of them that you'll have no problem finding what you need to tell your story. Sam added these and a few of the flat stickers from the upgraded embellishment kit around her photos and journaling tag. Finally, she used the alphabet stickers from the upgrade to create her title.
5. Chasing the Sunset Layout by Samantha Taylor
Sam can't decide what she loves more about this kit: the exclusive papers or fantastic stickers. So for this layout, she just decided to use a bunch of everything. Sam started with the multi striped paper as her base. Then, she added a square of yellow plaid paper on top of that to act as a frame for her photos. Next, she added the mountain strip from the mixed strip paper. On top of that, she added a small piece of black and white striped paper.

Also, she placed her photos and journaling tag. She used the alphabet stickers from the upgraded embellishments for her title. Finally, she added lots of puffy stickers from the included sticker sheet. All those great word stickers really help capture the emotions from her photos!


Get to see more camping scrapbook layouts on Sam's blog now!
6. Say Yes To New Adventures by Lori Carson
Since Lori didn’t really have any camping-themed pictures, she decided to take a twist on the papers and do something a bit unexpected. Using the border cut-a-parts, she selected the Say Yes to New Adventures and paired it with the yellow plaid paper.
This paper really seemed to be speaking to her and once she looked at the photos she needed to scrap, it seemed to go perfectly with the photo of her younger brother, Michael, proposing to his girlfriend in 2016. Michael had arranged to propose at sunset on the hill outside of Nelson’s, one of their favorite places. He arranged for a photographer to capture the moment and planned a big party right afterward for friends and family to celebrate. Thank goodness Marganne said Yes to this new adventure!
Once Lori had selected the paper, title, and photo, the rest just seemed to come together. She chose a solid brown cardstock to match the picture and make a tag, as well as a banner to say YES. She used die cuts for the tag (The Stamps of Life), the journaling (Queen & Co. Foundation Dies #2), and the banner (Queen & Co. Foundation Dies #10).

She used plain white card stock and cut out the letters Y, E, S using an ABC die from The Stamps of Life, which sadly is no longer available. For the palm tree die by The Stamps of Life, she cut it out from kraft paper and green cardstock then trimmed off just the leaves from the green. Next, she applied Gina K Warm Cocoa ink to the kraft die cut palm and around the edges of the journaling. Then, she used Gina K Charcoal Brown on the edges of the tag die.
Lori used Gina K Christmas Pine ink on the edges of the leaves for the palm tree. She colored in the coconuts and highlights on the palm tree using Spectrum Noir EB7. Then, she assembled everything and used ribbon on the tag and banner. Also, she added gems to the banner. The ribbon, gems, and cardstock are from her stash. You can watch her talk through the assembly of everything on her YouTube video/
7. Addy is One Happy Camper by Lori Carson
Lori's niece Addy turned one last October of 2020 and her parents threw her a camping adventure in her grandparent's backyard. Addy had a tent, a s'mores cake & cupcakes, and then she made her a t-shirt that said One Happy Camper. Family and friends joined in on the fun and it was a great day!
Lori used the 12 x 12 campfire paper and then on the left border, she added the wood border strip. Addy's mom (Marganne - Lori's sister-in-law) dipped Addy's hand in red, orange, and yellow paints and then placed them on the paper, then glued popsicle sticks to look like a campfire. So of course, Lori added that to the layout, along with a few pictures, a 3 x 4 cut a-part, and a journaling card. Next, using the puffy-themed stickers (included as an add-on in this month's kit), She added the lantern, tent, campfire, roasting marshmallow, and the s'more. It turned out super cute and she is sure Addy's mom will love it!

8. I Shore Do Miss You by Lori Carson
Although Lori is a Georgia-born Southern girl, she just relocated to South Carolina. Having spent the majority of her vacations on beaches, she just had to stay close to the coast if she couldn't get to the gulf. With that in mind, when she saw the papers in ScrapbookingStore.com's September 2021 kit, two of them immediately caught her eye as "beachy". So using those two 12 x 12 sheets she followed the ShowUsYourSheetload layout for August 2021 to make 8 cards as her tribute to summer's end.
She had already cut out the 3 x 4 cut a-parts from the 12 x 12 sheet, but she knew she wasn't going to use all of them as cut a-parts. So she flipped them over to use the striped paper. Next, she cut the wave paper into 8 pieces that measured 5 1/4 x 2 3/4 each. For the mat layers, she used Baja Breeze cardstock from Stampin' Up! and cut 8 pieces that were 5 1/2 x 3 and 8 pieces that were 4 1/4 x 3 1/4. For the pieces that were 4 1/4 x 3 1/4, she also die cut an oval out of them using Gemini Stitched Oval dies. Then, she ran those ovals through the die-cut machine using Pink & Main's Ocean Wave embossing folder.

Next, she used Gina K Tranquil Teal ink to add some depth to the embossing. She cut out a seahorse from scrap cardstock and stamped a sentiment from Pink & Main's Vitamin Sea collection to complete the card embellishments. Lori just love summertime and the beach, so anything that reminds her of it is always a winner in her book. Plus, it's been a while since she have gotten to hang with or even see some friends, so these cards are perfectly suited to send to them.
9. Cards by Lori Carson
Lori took the blue and white buffalo checked paper and cut it at 5.25". Then, she took that strip, turned it, and cut it into 3 equal 4" sides - which gave her (3) 5.25 x 4 pieces. She took two of those pieces and cut them on an angle. This split it into 4 angled pieces for 4 cards.

Next, she cut two pieces of navy card stock in half at 5.5 and then each of those in half at 4.25. These were the mats for the angled pieces. She adhered the buffalo check onto the cardstock, then used one white Love from Lizi peel-off and placed it on the card at the same angle as the patterned paper. Then, she simply embellished using the Thickers included in the ScrapbookingStore.com's September 2021 kit.
Enjoy creating your September projects with these awesome guides. Visit our blog for more camping scrapbook layouts and crafts using our monthly kits!
Join our exclusive Facebook Community for Club Members. It will grant you access to amazing layouts and content made by our design team, fun monthly contests, and FREE Facebook Live (Sep. 22nd) tutorials to meet other crafters!
Haven't subscribed yet? Now's your chance, be sure to sign up today!
GET OUR MONTHLY KITS DELIVERED TO YOUR DOOR!
