Springtime Treasures: My Favorite Memories
We are excited to share with you the enchanting collection from our March kit, My Favorite Spring by Echo Park. With its delightful array of designs, vibrant colors, and whimsical patterns, this kit is sure to inspire your creativity and capture the essence of this magical season.
Join our Design Team members on this scrapbooking adventure as we explore the wonders of spring through the art of memory keeping. From blooming flowers to chirping birds, from sunny picnics to refreshing rain showers, this collection is a treasure trove of elements that perfectly embody the spirit of this cherished time of year.
1.Live simply and bloom wildly
by Meggy Blethen
Hello fellow scrapbook enthusiasts! Today, we have the pleasure of following Crafty Meggy as she takes us through the step-by-step process of creating a beautiful layout using only the main kit from the My Favorite Spring collection by Echo Park. So, let's dive in and see how she brings her vision to life!
Step 1: Paper Selection
Begin by selecting your five favorite pattern papers from the kit. Meggy chose the 3x4 Journaling Cards, flower patch (both sides), 4x4 Journaling cards, and May Flowers. These papers offer a delightful mix of colors, designs, and themes that perfectly capture the essence of spring.
Step 2: Photo Preparation
Next, carefully choose your photos for this layout. She opted for three different-sized photos: one 4x6, one 3x2.5, and one 3.5x3.75. To give them an extra touch of style, she decided to mat each photo on her chosen pattern paper. Cut the pattern paper to measure 6.5x6.25 and glue the photos onto their respective mats.
Step 3: Creating the Base
To create a solid foundation for your layout, take another pattern paper from the kit and cut it to measure 6.75x8. Glue the photo mat onto this paper, ensuring that everything is aligned and centered. This base layer will provide stability and allow your photos to stand out.
Step 4: Layering and Dimension
Now it's time to add depth and dimension to your layout. Take the next pattern paper and cut it to measure 7.75x9. Carefully glue this larger patterned paper onto the base layer, making sure to leave a small border around the edges for a polished look. This layering effect will add visual interest and make your photos pop.
Meggy has chosen a fantastic combination of pattern papers so far, creating a harmonious composition that captures the essence of spring. Now, let's move on to the next steps and bring even more magic to this layout!

Step 5: Adding the Final Patterned Paper
Cut the next patterned paper to measure 9x10 and carefully glue it onto the previously layered patterned papers. This additional paper will contribute to the overall design and create a visually appealing composition. Now, for the final touch, take the last patterned paper, which will serve as your background, and cut it to measure 13x12. Glue this background paper onto your layered arrangement, ensuring everything is securely adhered.
Step 6: Gluing the Photo Mat and Embellishing
Position the photo mat you created earlier onto the background paper. Align it to your liking and glue it down, ensuring it is centered and balanced. Now comes the fun part—embellishing! Crafty Meggy used the sticker sheet included in the kit to add delightful accents and decorations. She also incorporated a couple of the 3x4 cut-apart pieces to complement the theme and add a personal touch.
Step 7: Placing the Journaling Card and Cluster
To complete the layout, take your chosen journaling card and place it in the bottom right-hand corner. This will provide a designated space for your thoughts and favorite memories related to the photos and the overall experience. Additionally, create a cluster of embellishments around the journaling card to enhance its visual appeal.
Step 8: Title Cluster
Meggy opted to create a title cluster for her layout. She placed it in the middle of the 4x6 photo, making it a focal point of the design. Consider using alphabet stickers or die-cut letters to spell out a relevant title that captures the essence of the moment or theme you're showcasing.


Step 9: Finalizing the Layout
Meggy's third cluster is positioned at the top right corner of the layout, adding balance and visual interest to the overall composition. Now, all that's left is to add your journaling. Crafty Meggy wrote about the enjoyable experience of pampering herself with a pedicure and getting her eyebrows waxed. Once you've completed your journaling, step back and admire your finished layout—a stunning showcase of favorite memories and creativity!
With the step-by-step instructions and Meggy's layout as inspiration, you can now create your own beautiful scrapbooking masterpiece using the My Favorite Spring kit by Echo Park. Have fun documenting your favorite memories and embracing the joy of spring! Make sure to watch Meggy on her Youtube channel and get to watch more celebrate scrapbook layouts.
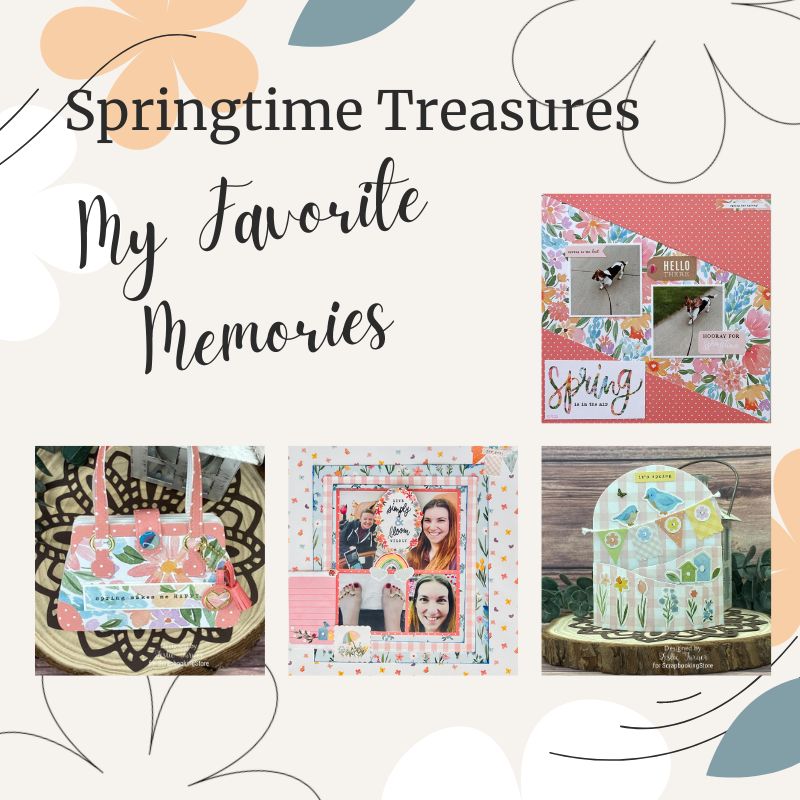
2. Spring is in the Air layout by Samantha Taylor
Sam, a lover of springtime strolls and a proud owner of a basset hound named Kevin, found herself capturing numerous silly moments of her furry friend's face amidst the breezy spring weather. Eager to immortalize these adorable memories, Sam decided to dive into the creative world of scrapbooking, armed with the perfect companion: this month's kit.
To begin her scrapbooking adventure, she opted for the large floral print paper as her base. Its vibrant colors and whimsical design perfectly captured the essence of spring. With a vision in mind, she moved on to the next step of her creative process.
Then, she carefully cut a 5" x 12" piece of coral pink paper from the kit. Wanting to add an interesting twist, she decided to slice the paper diagonally from corner to corner. She attached these triangular pieces to the top and bottom of her base paper, creating a visually appealing and dynamic layout that drew the eye towards her cherished photos.

Next came the most exciting part for Sam—adding the photos and a journaling tag. She selected the most endearing snapshots of Kevin's silly expressions and placed them thoughtfully on the layout. Sam wanted to ensure that each photo had its own special place, allowing them to shine amidst the colorful backdrop.
To enhance the visual appeal and add a touch of personality, Sam delved into the collection's assortment of embellishments. She turned to the included sticker sheet, carefully selecting the perfect additions to complement her photos and layout. Additionally, she took advantage of the embellishment upgrade kit, which offered an array of delightful elements to further elevate her creation.
With a steady hand and an eye for detail, Sam artfully positioned the stickers, strategically placing them around her photos and journaling tag. These embellishments added an extra layer of charm, capturing the playful spirit of her basset hound's springtime antics.


As she stepped back and admired her creation, Sam felt a sense of accomplishment and fulfillment. Her scrapbook layout beautifully conveyed the joy and lightheartedness of spring, showcasing her beloved companion's comical expressions and their shared adventures.
Through the thoughtful arrangement of photos, the addition of a journaling tag, and the artistic use of embellishments, Sam had successfully crafted a heartfelt keepsake—a tangible celebration of the bond she shared with Kevin and the joy they experienced together in the springtime breeze.
With this kit in hand and a world of creative possibilities awaiting, Sam couldn't wait to embark on future scrapbooking projects, capturing more favorite memories and cherishing them for years to come.
3. Happy Spring Days Scrapbook layout by Samantha Taylor
Sam's eyes light up with delight every spring when she sees high school students dressed to the nines for prom. The excitement in the air and the sight of young hearts ready to dance the night away always fills her with joy. Last spring, Sam had the privilege of witnessing her own nephew looking spiffy and dapper in his prom attire. With such precious memories captured, Sam knew that a spring-themed scrapbooking kit would be the perfect choice to showcase these prom photos in all their glory.
Sam eagerly began her scrapbooking project, selecting one of the blue floral prints as the base for her layout. The delicate blooms and soft hues instantly transported her back to that magical evening. The choice of this paper set the tone for the entire design, exuding a sense of enchantment and celebration.
To add an extra touch of charm and visual interest, Sam layered a 11 1/2" x 11 1/2" piece of pink gingham paper on top of the base. The interplay of colors and patterns created a delightful contrast, highlighting the beauty of her nephew's prom photos.
Next, Sam introduced a 10" x 5" piece of coordinating blue floral paper, strategically placing it to enhance the composition. This additional layer added depth and dimension, beautifully framing the focal point of the layout—the prom memories that Sam cherished dearly.

With the photos and journaling tag in hand, Sam artfully arranged them on the layout, paying attention to every detail. She carefully positioned each photo to create a harmonious flow, capturing the essence of the night and the emotions evoked by her nephew's prom experience. The journaling tag would serve as a heartfelt tribute, allowing Sam to document her thoughts and reflections on this memorable occasion.
To truly bring the layout to life, Sam reached for the stickers from the included sticker sheet. Each sticker was like a small treasure, perfectly complementing the prom theme and adding pops of color and personality. Sam skillfully placed the stickers around the photos and journaling tag, transforming the layout into a visual delight.
Not content with just the included stickers, Sam also turned to the embellishment upgrade kit. These extra embellishments provided the finishing touches, lending a touch of glamour and sophistication to the layout. Whether it was a sparkly gemstone or a delicate flourish, each addition further elevated the design, enhancing the beauty of the prom memories preserved within.


As Sam stepped back to admire her completed layout, she couldn't help but feel a sense of accomplishment and pride. The prom photos were now immortalized in a stunning composition that encapsulated the magic of that spring evening. The layout served as a tribute to her nephew's milestone and a testament to the joy that prom brings to so many.
With the scrapbooking project complete, Sam couldn't wait to share her creations with others. She invited fellow crafters to visit her blog, where they could explore more of her gorgeous layouts and craft ideas. Through her blog, Sam hoped to inspire others to capture and cherish their own favorite memories, transforming them into works of art that would be cherished for a lifetime.
Spring Memory Album by Leslie Turner
Leslie loves Spring and thinks the coordinating papers and stickers in this month’s kit are pretty amazing. Using a purse builder die set in her stash, she created a Spring-themed memory album using a variety of papers, stickers and upgrades from the collection.

She cut the album base from heavyweight white cardstock and covered the front and back with a pretty floral paper from the kit. She then cut each page from a lighter weight white cardstock and embellished them with coordinating papers. She used stickers from the sticker sheet and die cuts created with cardstock and dies from her stash, and created pull-outs and pull-ups on several of the pages, leaving plenty of room for photos and journaling. She embellished the front with a sentiment from the sticker sheet, added a Velcro circle for the closure and embellished the closure strap with an enamel dot from the upgrades.


Happy Birthday Silhouette Card by Leslie Turner
Leslie likes the upgrades in this month’s kit and used primarily die cuts from the upgrades to create this pretty silhouette birthday card. The fact that the die cuts can easily be used in a ‘stand-alone’ fashion for many projects is a definite plus!

She cut a standard A2 size side-folding card base from heavyweight ivory cardstock. Using dies in her stash and a scrap of the pink plaid paper from the collection, she die cut four ornamental corners for the card front. Using a stitched oval die and gold foil cardstock in her stash, she cut an oval for the card front, and then created the focal element by adhering a die cut silhouette, butterfly and flagged sentiment from the upgrades. Using a ruler, she bent the butterfly in half, creating dimension on the wings. She also added brown twine to the sentiment flag.

She cut the inside panel from a lighter weight ivory cardstock and embellished it with strips of light pink and gold foil cardstock. She stamped a sentiment in brown ink and layered the panel on light pink cardstock.
April Showers Card by Leslie Turner
Leslie likes the coordinating journaling cards, stickers and papers in this month’s collection because she can make a card in no time! There are journaling cards and stickers for just about every sheet of patterned paper in the kit! Who doesn’t love that?! She created a sweet card using an umbrella journaling card with totally matching patterned paper.

She cut a standard A2 sized side-folding card base from heavy weight white cardstock along with a layering panel from the matching patterned paper in the kit, and layering panels from silver foil and black cardstock from her stash. She trimmed the journaling card, layered the panels together, and adhered them to the card front. She added a couple star epoxy stickers from the upgrades and applied Glossy Accents to the raindrops for a little interest

She cut the inside panel from lighter weight white cardstock and embellished it with a wide strip of the patterned paper and a narrow strip of black cardstock used on the front. She added a sentiment sticker from the sticker sheet, which completed the card.
Spring Bendi Card by Leslie Turner
Leslie likes the variety of the patterned papers and coordinating stickers in this month’s kit. She is a self-proclaimed ‘fun fold fanatic’ and created a Spring bendi card using a die set from her stash along with patterned papers and stickers from the collection.

She die cut the bendi card base pieces from a pretty pink plaid paper in the kit, adhered the panels to each side, and embellished them with stickers from the sticker sheet, white twine and several small gemstones from her stash.


Collect Moments Card by Leslie Turner
Leslie really likes the die cuts in the upgrades in this kit. There are so many options for so many different types of cards that work up quickly, and any crafter with a busy schedule can certainly appreciate that! She created a pretty uplifting friendship card featuring a circular aperture in the front flap showing off a gorgeous foiled die cut.

She cut a standard A2 size side-folding card base from heavyweight ivory cardstock and die cut a circle into the front flap using a die from her stash. She then dies cut a frame from dark green cardstock to go around the aperture using the same circle die plus one slightly larger. She adhered a die cut from the upgrades into the opening using double-sided foam pads. The finishing touch was adding several gold pearls from her stash.

See more of Leslie’s favorite memories projects on her blog!
These are just some of the great Christmas craft ideas our Design Team members shared with us. We hope you love it and get inspired to make them. If you want to add an extra touch on your gifts, tag along some of these crafts, the receiver will surely appreciate it.
Don't forget to visit our online store! We’re adding new items all the time and Club Members get 10% off. Visit our blog for more craft and layout inspirations using our scrapbooking kit.
Join our exclusive Facebook Community for Club Members. It will grant you access to amazing layouts and content made by our design team, fun monthly contests, FREE Facebook Live tutorials and you'll get to meet other crafters!
Haven't subscribed yet? Now's your chance, be sure to sign up today!
GET OUR MONTHLY KITS DELIVERED TO YOUR DOOR!
