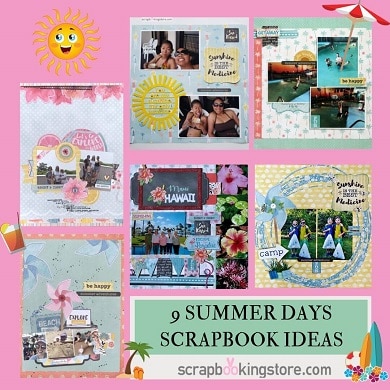
9 Summer Days Scrapbook Ideas
We all know how fast summer flies by, no matter how much we try to live in the moment. So why don't you do something different this year? Scrapbook and save all those lovely memories of a fun summer spent with the family! Years from now the layouts you create will make wonderful keepsakes.
Here are some Summer Days scrapbook ideas our amazing Design Team members shared with us!
1. At The Pool Layout By Marci
Apart from the two cute buttons, Marci only used the materials from the July kit collection. She started the layout by choosing the background paper with the flamingo in the lower right corner. Then, she matted the 2 photos at the bottom of a sheet of white cardstock, leaving the remaining white cardstock to go to the top of the page. She also popped up the heart sticker strip and placed it at the bottom of the photos. Then, she stamped some yellow and blue "sprinkles" on her adorable layout.

For the design under the photos, she cut squares from the striped paper included in the kit and left a little bit of space between each one. The title was cut out on Marci's silhouette cameo and the word "Pool" looks watery, but she actually used our flower sheet and inked it a little on the edges! She wanted to make the flamingo stand out so she popped up the relax sticker. Then, she also folded the butterfly connecting it to the page and tucked one of the leaf stickers under it.
At the top of the white paper, she used the banners in the kit and attached them to the 2 buttons and a strip of paper (also from our kit)! To the left and right of the photos she decided to attach a thin strip of punched paper. Marci emphasized the punch outs by placing a dragonfly above them. What a beautiful way of encouraging her grandsons!
2. Sunshine is the best Medicine
Marci chose these particular papers from our July kit collection because she feels they really make her photos stand out! One of the boys favorite activities to do at camp is fishing - hence the “fishy” background choice. She then went ahead and used the blue flower paper and her Silhouette Cameo to cut the "messy" circle almost in a 12 x 12 size. Then, she attached that circle and her photos first. Next, she placed the pinwheel at an angle overlapping the photo. In the middle of the pinwheel she placed one of the flower sticker with a couple of leaf ones around it. She topped off the pinwheel by attaching the folded butterfly and attaching it only at the center.

Marci used some tiles she had in her stash and tucked in "grass" (cut with the Silhouette Cameo) behind them. She then used her Silhouette Cameo to cut the arrow with the word CAMP which she popped up overlapping the pinwheel. To give the layout the balance that she wanted, she placed the "Sunshine" die cut in the upper right corner and popped up a couple of bees as well as the dragonfly.
To finish off this page, she placed various stickers/die cuts included in this collection both in the middle of the two photos and on the right hand side of the layout. Check out more of Marci's fantastic layouts on her blog!
TIP: If you want to use "pop up" stickers: Use baby powder on the back of the sticker to take away the adhesive and then use your pop dots on the back of the sticker.
3. Maui Trip by Melissa
This layout was so much fun to make! Not only are these papers PERFECT for summer vacations they really inspired Melissa to work on the Maui trip she took with her Mom and sister.
The chalkboard piece is part of the diecut pack and comes with the upgrades. She trimmed the border off of the chalkboard piece (you will notice she used a piece of that border underneath the main photo on the page). The chipboard is a rectangle colored with distress ink and Wink of Stella glitter pen. Flowers and title were cut on a Cricut using scrap paper. She used a Wink of Stella glitter pen on the flowers.

Melissa lost her cousin Rick in 2018 on his beloved island of Maui. This is why she hid the journaling, because they had a bittersweet vacation. The family was glad to have spent more time with him. Rick is the one on the left hand side of the photo. The journalling hidden behind the main title was about how her cousin and his wife were such great hosts. The tag is made from cardstock from her scraps and the pull tab is from the sticker sheet in the kit.
She surrounded the beautiful photo with elements from the kit and the upgrades! This is where you will see a portion of the chalkboard diecut border at the bottom. The banners from the diecut pack in the upgrades were used to place a banner under the main image. Then, Melissa layered the fun diecut on a banner piece. The layered suitcase on another banner piece was cut out of patterned paper included in the July kit.


Foam squares were used to pop these elements off of the page. She also used two different embossing folders to give the diecuts, banner shapes, and the stickers an extra dimension. The sticker "Escape to Paradise" was trimmed, embossed and popped up with foam dots. A trick to pop up a sticker is to use baby powder on the back of it so it is no longer sticky! At the bottom of the page, she added a strip of chalkboard paper under the heart diecut that was part of the upgrades.
Showcased on the right side of the page are just a few of the many photos taken of the beautiful flowers in Maui. Lastly, she cut these down to 3X3” and layered them on the light teal paper and the striped paper included in the kit. This multi-photo layout is jam-packed with kit elements and includes FIVE photos from their trip. Check more of Melissa's projects on her Instagram and Facebook page!
4. Beach - Be Happy Layout by Nicole
Nicole used the peach patterned paper with the polka dots as the base for this layout. With the help of a 12-inch Trimmer, she cut the polka dot patterned paper to measure 8 ½”x11” and the turquoise patterned paper to measure 8”x10 ½”. Note: If you prefer to create 12”x12” layout, cut the turquoise paper to measure 11 ½”x11 ½” and leave the polka dot patterned paper at 12”x12”.

She mounted the turquoise patterned piece in the middle of the base. Then, she used a spray ink, unscrewed the cap and gently tapped the mist all over the layout. Following that, she cut the pinwheel die cut in half and adhered them along the top left side and the top right side of the layout. Using PicMonkey, she created a collage of three photos and printed it on 4”x6” photo paper, cropping the white space from the photo.


Then, she adhered the stickers and die cuts in a cluster towards the bottom of the base. She mounted the strip of photos across the die cuts.. She proceeded to mount the pink pinwheel to the center of the cluster of embellishments, tucking the stick behind the strip of photos. She then glued a cute button to the center of the pinwheel. Nicole also glued the “Be Happy” sticker and “summer adventures” die cut to the top right side of the pink pinwheel. Using foam squares to add dimension to the die cuts and stickers as desired.
5. Let’s Go Explore the World
For the second layout, Nicole used the striped patterned paper as the base for this beautiful layout. She used a 12-inch Trimmer, cut the light blue patterned polka dot paper to measure 8”x10 ½”. Note: If you prefer to create 12”x12”, cut the light blue patterned paper to measure 11 ½”x11 ½” and leave the striped patterned paper at 12”x12”. Nicole then cut a strip from the fish patterned paper to measure 8”x1/4”. Also, she mounted the blue patterned paper in the center of the base and adhered a strip at the bottom of the blue patterned paper horizontally.

She printed and cropped 2 4”x6” photos to measure 3”x3”. Then, she cut the flower die cuts in half and adhered them across the top of the layout. Using black ink, she created a stitched border using a stamp. Nicole then adhered the die cuts and stickers to the center of the page, all while being careful of the placement before mounting everything down.
She ensured that the embellishments are visible on the sides before mounting the photos down and matted one photo using the yellow frame die cut, then adhered the rest of the photos as shown.


Foam Squares were used to layer and add dimension to the flowers and embellishments. Then, she glued a button to the center of the flower and added journaling using a stamp below the flower towards the bottom of the layout. Nicole placed two sticker words on the 2nd photo towards the bottom right-side of the photo. She also added a tiny heart from her stash on hand, as well as a tiny label.
Lastly, she cut the “Bright & Summer” sentiment from the die cut and adhered it across the bottom of the first photo to complete the layout. See more of Nicole's layouts on her blog!
6. Sun Kissed Vacation by Sam Taylor
July's kit is full of papers that are a bit out of Sam's wheelhouse, but that's what she loves about being part of our awesome kit club, it makes her try new things! She was also very surprised at how quickly and easily she was able to put this layout together.

The papers in this kit coordinate so well that you can't possibly go wrong. She had some really bright photos to use this time around, so she chose one color (the yellow in her niece's dress that's also on the floatie they're sitting on) and made sure that all her papers and embellishments coordinated with the yellow.
7. Summer Getaway
Sam had some photos from an indoor water park that they visited a few years ago. These photos were perfect for this months kit! The water park had a tropical theme and had these large palm trees painted on the wall. When she saw this month's kit, she immediately thought of these photos. The beachy feel of the kit mixed perfectly with the tropical theme of my photos.

To spice things up a bit, Sam overlapped her photos in a cluster in the center of her layout. To keep the photos from blending into each other, she used different dimensional adhesives to put each photo on a different level. Want to see more of Sam's gorgeous layouts? Visit her blog now!
8. You Are My Sunshine by Terra
Terra used the Beach Babes patterned paper. She took two photos of herself and her daughter being silly while on vacation and matted them to white card stock. Then, she placed them on opposite edges of the page. She embellished them with three of the Bo Bunny Noteworthy pieces in the upper right corner.

Such a fun layout! She finished it by using a machine cut file (My sunshine cut out by Alla' K) from the Silhouette store in the lower left corner. Since the vowels didn't have their centers cut out, Terra used Nuvo crystal drops to add an additional pop of color.
9. Welcome To Paradise
As for Terra's second layout, she used the coral palm tree paper. She started by placing the fish strip sticker in the middle of the page. Then centered "Welcome to Paradise" on the left. She took a 4x6 picture of her son and cut it into three strips, then matted them onto cream colored card stock. She tried to space them evenly so we can still see the fish strip beneath.

Terra used the following machine cut files from the Silhouette store: Summer Fun Frame by Tanya Batrak (placed around her son), Dolphin by Carina Gardner (at the bottom of the page, in the waves), and Sunshine Clouds (she only used a couple of the birds from this file) by Loni Stevens. The waves at the bottom of the page are a cut file from Paper Issues title Whitecaps in the Lake background.
Check out more of Terra's amazing crafts and layouts on her Instagram!
What memories from this summer would you like to add in your scrapbook? Subscribe now and share your projects with us by joining our Facebook Community, dedicated for club members!
GET OUR MONTHLY KITS DELIVERED TO YOUR DOOR!
