
DIY Christmas Ornaments for Kids: Easy and Creative Crafts
Christmas is a yearly celebration that kids and adults look forward to, and it is the time when we pull out all the decorations. It is also a time for the creative bunch, especially if you have kids. From Styrofoam to popsicle sticks, and even old CDs, there are so many possibilities for DIY Christmas ornaments for kids. Thus, we will list some easy DIY projects that you and your kid will truly enjoy doing and make your Christmas merrier.
DIY Christmas Ornaments for Kids
All the DIY Christmas ornaments that we have listed below are inexpensive to make. Most of these supplies are something you would typically find at home, or you can easily pick up at the nearest dollar store.
Additionally, all of them are easy and fun for your kids to make. Some may not even require any assistance from you. We are certain that at the end of it, your kid is going to be so proud when they put up their decorations, and you can treasure these keepsakes for years to follow.
1. Salt Dough Hand Print Ornament
Make dough, and then let your child put his or her handprint in it, then after which, bake it and put it on the tree. This beautiful DIY Christmas ornament is not just easy to make with a little help from you, but it also is a fantastic keepsake. How heartwarming is it to have your little kid’s handprint decades later?
The goal is to make a handprint on one ornament. The supplies listed below will allow you to make up to three ornaments, depending on the size you desire.

Supplies Needed:
- One cup of salt
- Four cups of flour
- A large mixing bowl
- Little water
- Little oil
- Food coloring of your choice
- A cookie sheet
- A rolling pin
- A ribbon
- A drinking straw
- A plate for a guide
Instructions:
- In a large bowl, begin by gradually mixing in the flour and salt with the water.
- Once it has formed into dough, take your cookie sheet and lightly grease it with oil. With the rolling pin, roll out the dough on the sheet.
- Ensure that after rolling it, it is thick enough to form your child’s fingerprint. If you have rolled it out too much, this won’t work.
- Once your child has formed a fingerprint in the dough, take the drinking straw to make a hole.
- Put it in a pre-heated oven at 150 degrees Celsius for about an hour. Alternatively, you can also air dry it overnight.
- Once ready, tie the ribbon through the hole to make it into a Christmas ornament.
2. Snow Filled Monogram Ornaments
Snow filled monogram ornaments are possibly the easiest Christmas decorations your kids can make. This is a great last-minute gift idea since it takes no more than five minutes to make it.

Supplies Needed:
- A clear glass ball ornament
- Epsom salt
- Ribbon
- A vinyl initial
Instructions:
- Remove the hanger from the ornament.
- Fill the ornament halfway with the Epsom salt. This looks a lot like snow.
- Replace the hanger.
- Stick the vinyl letter on the ornament. You can easily find this at a supply store, or you can cut one from a craft cutter.
- Make a bow with the ribbon and add it around the hanger.
3. Craft Stick Christmas Tree
If you are looking for yet another simple DIY Christmas decoration for your kid to make, then we highly recommend you try out the craft stick Christmas tree.

Supplies Needed:
- One long brown craft stick
- Five green craft sticks
- Scissors
- Glue
- Thread
- Some jewels to decorate the tree (optional)
Instructions:
- Begin by cutting four of the five green craft sticks. The way you do this is by cutting every stick an inch lesser than the previous stick. This will give it that tapering down effect like a Christmas tree.
- Stick each of them horizontally on the vertical brown craft stick, starting from the longest. Leave an inch away from the bottom and leave about less than a centimeter between each of the green craft sticks.
- Make a loop with a thread and either tie or stick it on the topmost part of the stick.
- Now you can glue all sorts of decorations such as jewels all over it.
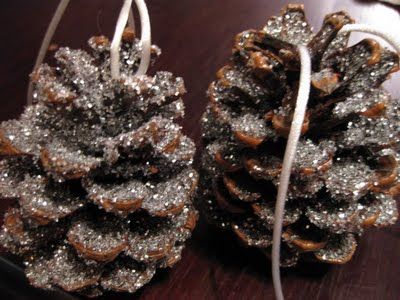
4. Glittery Pinecone Ornaments
You know it is Christmas time when you see pinecones and glitter shining everywhere. So, for this DIY Christmas ornament, we will tell you how you can make a quick and easy glittery pinecone ornament.
Supplies Needed:
- Pinecones
- Glitter
- Paintbrush
- Brown paint
- Ribbon
- Glue
Instructions:
- Begin by painting the pinecones with brown paint and before it fully dries, throw glitter all over it.
- Take some glue and lightly brush it all over the pinecone so that the glitter stays in place.
- Make a loop using the ribbon and stick it on top of the pinecone to put it as a decoration on your Christmas tree.
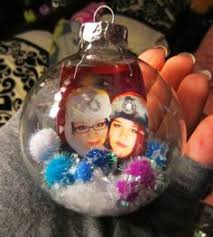
5. Time Capsule Ornament
It’s always great to look at the good old days when we were kids. Our books, our art, our baby pictures, they all bring an instant smile on our faces. So, for this DIY ornament, we will be making a time capsule ornament which we are certain you will treasure for years to come.
Supplies Needed:
- Plastic clear ornament
- Mod Podge craft glue
- Metal prongs
- Pen and paper
- Sponge brush
- Your child’s picture
Instructions:
- Cut small strips of paper and make your child write anything eventful that happened to him or her that year. This can include vacations, play time, names of best friends, favorite teachers, and so on.
- Carefully take off the top of the plastic ornament using metal prongs.
- Roll the strips of paper and slip them inside the ornament and shut it by fitting the top again.
- Now take your child’s photo that will fit on the outside of the ornament and apply some Mod Podge behind it.
- Stick it on the ornament and smooth it out with your fingers.
- Write the year on the picture, so you are well aware of it years later too.
- Once it dries, apply a coat of Mod Podge on the photo and let it dry.
Conclusion
These five DIY Christmas ornaments for kids are not only easy but also fun to make. Most of these require very little assistance from you. Push your child to make all of these ornaments and don’t worry about it being perfect. It is the imperfections you will love to see several years later!
GET OUR MONTHLY KITS DELIVERED TO YOUR DOOR!
